With SQL Server 2016 Upgrade Advisor, you can easily check for any issues in your databases that may interfere with the upgrade process so that you can pinpoint and fix them quickly. Then, it is a simple process to move your databases that aren’t using any high-availability or disaster-recovery features from their current instances to SQL Server 2016. Using MS SQL Server 2016 Upgrade Advisor to check for upgrade issues, how to fix non-ANSI join syntax issues, and how to migrate a database to a newer version of SQL Server.
Hopefully at this point you already know which databases you want to move. Click the button labeled “Analyze and Migrate to SQL Server” and connect to the server hosting the databases you are migrating. Now, you can select the databases on this server that you will be upgrading and click “Run” to begin the initial analysis.
At this point, Upgrade Advisor will analyze the schema and look through stored procedures, functions, triggers, and more for any issues that may arise when migrating these databases. Upon completion, you will see a compatibility assessment for each database that indicates how many compatibility issues each may have. Clicking on the database will allow you to view the results in detail.
Reviewing and exporting the flagged issues
Upgrade Advisor will display the compatibility issues next to their associated version within the database under three categories. The first category, which will be shown in red, denotes High Severity issues that must be resolved before the upgrade can be completed. The second category, shown in yellow, indicates Medium Severity issues that may become a larger problem with future SQL Server versions and may cause problems with this version. The third category, shown in blue, are Low Severity issues that can typically be ignored at this point. If you click on the issues, you can view them in more detail.
By clicking the save icon in the upper-right corner, you can also export the compatibility report and save it as a separate file.
The report generated by the export function can be created as either an HTML or a CSV file, and it will allow you to review the report outside of Upgrade Advisor.
Resolving High Severity issues
Upon viewing the issues, click the red issues marked as High Severity to get more details on the cause. One of the most common issues you will encounter is an ANSI join issue related to improper syntax. Fortunately, this can be fixed easily. First, go to Management Studio and find the Stored Procedure where the error occurred. Open the stored procedure, and highlight the query where the error is. Then, simply right-click, choose “Design Query in Editor,” and click “OK” to automatically convert to the ANSI join syntax.
Finalizing the upgrade process
After fixing all of the High Severity issues, run another analysis of the databases using Upgrade Advisor. Hopefully, the analysis should return no more High Severity issues. At this point, click the “Migrate” button. Now, choose your Destination Server and click “Connect.” Finally, click the second “Migrate” button to complete the process.
Now, your databases should be successfully migrated to your newer version of SQL Server. If need be, you can verify this by refreshing the server in Management Studio and locating the migrated databases on that server.
There is no in-place upgrade from SharePoint 2013. You must upgrade each content database using the Database Attach and upgrade Method. SharePoint 2016 does not support classic mode authentication. Many SharePoint 2013 web applications still utilize classic mode authentication. For content databases using classic mode authentication, you must migrate to Claims Based authentication before you begin migrating your data. According to the Microsoft TechNet Article, “SharePoint Server 2016 supports an upgrade from SharePoint Server 2013 with Service Pack 1 (SP1) with March 2013 PU, version 15.0.4481.1005 or higher. All database must be upgraded to version 15.0.4481.1005 or higher, otherwise upgrade to SharePoint Server 2016 will be blocked.” https://technet.microsoft.com/en-us/library/cc262483(v=office.16).aspx
Create a new site collection in SharePoint 2013
Move the site to a temporary database
Make a copy of DB in SharePoint 2013 environment and move it to the SharePoint 2016 database server
Test the SharePoint 2013 attached DB in SharePoint 2016 environment, Mount the DB and upgrade DB
Change the site collection owner and Hit the site and test everything
STEP 1 – CREATE A NEW SITE COLLECTION IN THE SHAREPOINT 2013
Create a brand new site collection in the SharePoint 2013 environment to test the upgrade process from SharePoint 2013 to SharePoint 2016.
in this Powershell cmdlet, we create a new site collection in SharePoint 2013 based on the team site template.
STEP 2 – MOVE THE SITE COLLECTION TO A TEMPORARY DATABASE
It is always good to move the site collection into a new database and then move the new database to SharePoint 2016. By doing this, you will not face any orphaned object problem while upgrading. Sometimes SharePoint doesn’t clear the database nicely when you delete items from the interface and this will cause the orphaned object problem. Orphaned object means you have deleted something from the SharePoint interface (list, subsite,..), but the object is still exist in the database level. So it is always a good practice to move the site collection to a new database before upgrading.
After moving the site into a new db, you have to do IIS reset
STEP 3 – MOVE THE DB
This step is done on SQL Servers. First you have to login to your SharePoint 2013 SQL Server machine and connect to your SQL Server instance with the SQL Server management studio.
Expand databases node, right click on the database name -> tasks -> backup
Copy the backup file to the SharePoint 2016 database server.
Open SQL server management studio in SharePoint 2016 database server.
Connect to the database server
Right click on database, select restore database
Select the device and select your backup file
Double check everything, and click on ok
The database name will show in the list of databases
Now you have to add the farm account to the database as the db_owner role.
Expand the database name -> security – > users and add the SharePoint 2016 farm account
[I have different accounts for setup and farm as Microsoft suggested in the best practice, I added both of them as the user of this db and made them db_owner]
STEP 4 – TEST AND MOUNT THE DB
If the managed path does not exist in SharePoint 2016, you can create it with this cmdlet:
now the upgrade process is completed. It is likely that you have different accounts to access your SharePoint 2013 and SharePoint 2016 environment. So now if you hit the site you will see an access denied message. You have to login to the SharePoint 2016 central administration and change the site collection administrator for the newly upgraded site to your SharePoint 2016 site admin. Then you can hit the site and see the home page of the site.
In order to verify that the upgrade process is done without any error, you have to go to the site settings and under the “Site Collection Administration” section, click on the Site collection upgrade link.
You see the upgrade page, you can now click on the Review Site Collection Upgrade Status to see the report.
As you see in the upgrade process is done without any error or warnings
Here you have the whole powershell script for this blogpost. You can use this powershell to upgrade your sites from SharePoint 2013 to SharePoint 2016. Just remember step 1 and 2 are done in SharePoint 2013 environment, step 3 are done on SQL servers of both environment via GUI and step 4 and 5 are in SharePoint 2016 environment
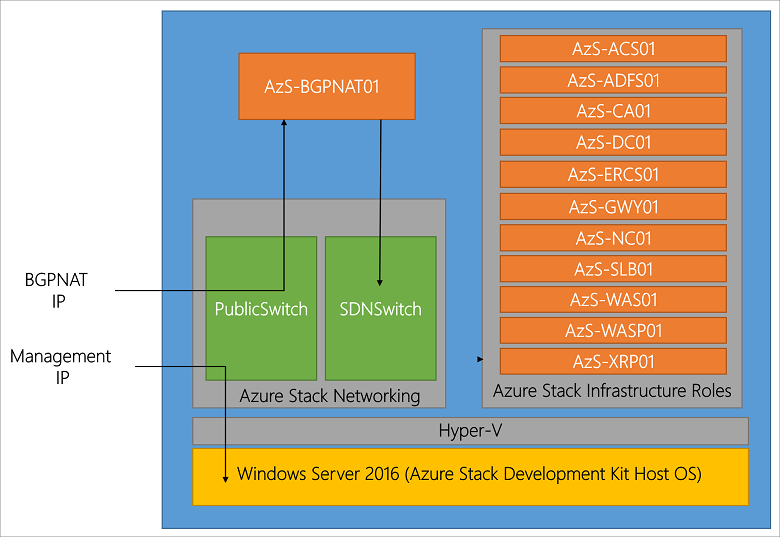
The Azure Stack POC is a one-node deployment of Azure Stack Technical Preview 3. All the components are installed in virtual machines running on a single host machine.
The following diagram illustrates the logical architecture of the Azure Stack POC and its components.
Virtual machine roles
The Azure Stack POC offers services using the following VMs on the POC host:1
Name
Description
MAS-ACS01
Azure Stack storage services.
MAS-ADFS01
Active Directory Federation Services (ADFS).
MAS-BGPNAT01
Edge router and provides NAT and VPN capabilities for Azure Stack.
MAS-CA01
Certificate authority services for Azure Stack role services.
MAS-CON01
Console machine available for installing PowerShell, Visual Studio, and other tools.
MAS-DC01
Active Directory, DNS, and DHCP services for Microsoft Azure Stack.
MAS-ERCS01
Emergency Recovery Console VM.
MAS-GWY01
Edge gateway services such as VPN site-to-site connections for tenant networks.
MAS-NC01
Network Controller, which manages Azure Stack network services.
MAS-SLB01
Load balancing multiplexer services in Azure Stack for both tenants and Azure Stack infrastructure services.
MAS-SUS01
Windows Server Update Services, and responsible for providing updates to other Azure Stack virtual machines.
MAS-SQL01
Internal data store for Azure Stack infrastructure roles.
MAS-WAS01
Azure Stack user (tenant) portal and Azure Resource Manager services.
MAS-WASP01
Azure Stack administrative portal and Azure Resource Manager services.
MAS-XRP01
Infrastructure management controller for Microsoft Azure Stack, including the Compute, Network, and Storage resource providers.
Storage services
Virtual Disk, Storage Space, and Storage Spaces Direct are the respective underlying storage technology in Windows Server that enable the Microsoft Azure Stack storage resource provider. Additional storage services installed in the operating system on the physical host include:
Name
Description
ACS Blob Service
Azure Consistent Storage Blob service, which provides blob and table storage services.
SoFS
Scale-out File Server.
ReFS CSV
Resilient File System Cluster Shared Volume.
Before you deploy Azure Stack POC (Proof of Concept), make sure your computer meets the following requirements. Therefore, you can use the same hardware that you used for the previous single-box preview.
Hardware
Component
Minimum
Recommended
Disk drives: Operating System
1 OS disk with minimum of 200 GB available for system partition (SSD or HDD)
1 OS disk with minimum of 200 GB available for system partition (SSD or HDD)
Disk drives: General Azure Stack POC Data
4 disks. Each disk provides a minimum of 140 GB of capacity (SSD or HDD). All available disks will be used.
4 disks. Each disk provides a minimum of 250 GB of capacity (SSD or HDD). All available disks will be used.
Compute: CPU
Dual-Socket: 12 Physical Cores (total)
Dual-Socket: 16 Physical Cores (total)
Compute: Memory
96 GB RAM
128 GB RAM
Compute: BIOS
Hyper-V Enabled (with SLAT support)
Hyper-V Enabled (with SLAT support)
Network: NIC
Windows Server 2012 R2 Certification required for NIC; no specialized features required
Windows Server 2012 R2 Certification required for NIC; no specialized features required
Data disk drive configuration: All data drives must be of the same type (all SAS or all SATA) and capacity. If SAS disk drives are used, the disk drives must be attached via a single path (no MPIO, multi-path support is provided).
HBA configuration options
(Preferred) Simple HBA
RAID HBA – Adapter must be configured in “pass through” mode
RAID HBA – Disks should be configured as Single-Disk, RAID-0
Supported bus and media type combinations
SATA HDD
SAS HDD
RAID HDD
RAID SSD (If the media type is unspecified/unknown*)
SATA SSD + SATA HDD
SAS SSD + SAS HDD
* RAID controllers without pass-through capability can’t recognize the media type. Such controllers will mark both HDD and SSD as Unspecified. In that case, the SSD will be used as persistent storage instead of caching devices. Therefore, you can deploy the Microsoft Azure Stack POC on those SSDs.
Example HBAs: LSI 9207-8i, LSI-9300-8i, or LSI-9265-8i in pass-through mode
Sample OEM configurations are available.
Operating system
Requirements
OS Version
Windows Server 2012 R2 or later. The operating system version isn’t critical before the deployment starts, as you'll boot the host computer into the VHD that's included in the Azure Stack installation. The OS and all required patches are already integrated into the image. Don’t use any keys to activate any Windows Server instances used in the POC.
Deployment requirements check tool
After installing the operating system, you can use the Deployment Checker for Azure Stack to confirm that your hardware meets all the requirements.2
Account requirements
Typically, you deploy the Azure Stack POC with internet connectivity, where you can connect to Microsoft Azure. In this case, you must configure an Azure Active Directory (Azure AD) account to deploy the POC.
If your environment is not connected to the internet, or you don't want to use Azure AD, you can deploy Azure Stack by using Active Directory Federation Services (AD FS). The Azure Stack POC includes its own AD FS and Active Directory Domain Services instances. If you deploy by using this option, you don't have to set up accounts ahead of time.
Note
If you deploy by using the AD FS option, you must redeploy Azure Stack to switch to Azure AD.
Azure Active Directory accounts
To deploy Azure Stack by using an Azure AD account, you must prepare an Azure AD account before you run the deployment PowerShell script. This account becomes the Global Admin for the Azure AD tenant. It's used to provision and delegate applications and service principals for all Azure Stack services that interact with Azure Active Directory and Graph API. It's also used as the owner of the default provider subscription (which you can later change). You can log in to your Azure Stack system’s administrator portal by using this account.
Save these credentials for use in step 6 of Run the PowerShell deployment script. This service administrator account can configure and manage resource clouds, user accounts, tenant plans, quotas, and pricing. In the portal, they can create website clouds, virtual machine private clouds, create plans, and manage user subscriptions.
Create at least one account so that you can sign in to the Azure Stack POC as a tenant.
Azure Active Directory account
Supported?
Work or school account with valid Public Azure Subscription
Yes
Microsoft Account with valid Public Azure Subscription
No
Work or school account with valid China Azure Subscription
Yes
Work or school account with valid US Government Azure Subscription
One available port on a switch for the POC machine.
The Azure Stack POC machine supports connecting to a switch access port or trunk port. No specialized features are required on the switch. If you are using a trunk port or if you need to configure a VLAN ID, you have to provide the VLAN ID as a deployment parameter. You can see examples in the list of deployment parameters.
Subnet
Do not connect the POC machine to the following subnets:
These subnets are reserved for the internal networks within the Microsoft Azure Stack POC environment.
IPv4/IPv6
Only IPv4 is supported. You cannot create IPv6 networks.
DHCP
Make sure there is a DHCP server available on the network that the NIC connects to. If DHCP is not available, you must prepare an additional static IPv4 network besides the one used by host. You must provide that IP address and gateway as a deployment parameter. You can see examples in the list of deployment parameters.
Internet access
Azure Stack requires access to the Internet, either directly or through a transparent proxy. Azure Stack does not support the configuration of a web proxy to enable Internet access. Both the host IP and the new IP assigned to the MAS-BGPNAT01 (by DHCP or static IP) must be able to access Internet. Ports 80 and 443 are used under the graph.windows.net and login.windows.net domains.
After you’ve determined that your hardware meets the requirements, run this script to make sure you have the right hardware configuration.
##
##
##    Standalone Edition
##    Copyright (C) Microsoft. All rights reserved.
##
##


function CheckNestedVirtualization {

    write-host -ForegroundColor yellow "["(date -format "HH:mm:ss")"]" "Checking for physical/virtual machine status..."

    $BaseBoard = (Get-WmiObject Win32_BaseBoard)
    If ($BaseBoard)
        {
        If (($BaseBoard.Manufacturer.Tolower() -match 'microsoft' -and $BaseBoard.Product.Tolower() -match 'virtual') -or ($BaseBoard.Manufacturer.Tolower() -match 'vmware'))
            {
            write-host -ForegroundColor red "["(date -format "HH:mm:ss")"]" " -- WARNING : This server seems to be a virtual machine running on Hyper-V or VMware. Running Azure Stack Technical Preview on a nested hypervisor is not a tested or supported scenario. Setup will not block this, but this but this may lead to performance or reliability issues."
            $Global:ChecksFailure++
            }
            else
            {
            write-host -ForegroundColor green "["(date -format "HH:mm:ss")"]" " -- This is a physical machine."
            $Global:ChecksSuccess++
            }
        }
        else
        {
        write-host -ForegroundColor green "["(date -format "HH:mm:ss")"]" " -- This is a physical machine."
        $Global:ChecksSuccess++
        }

}

function CheckInternetAccess {
    write-host -ForegroundColor yellow "["(date -format "HH:mm:ss")"]" "Checking Internet access..."

    # Test AAD http connection.
    try {
        $resp = Invoke-WebRequest -Uri "https://login.windows.net" -UseBasicParsing
        if ($resp.StatusCode -ne 200) {
            write-host -ForegroundColor red "["(date -format "HH:mm:ss")"]" " -- Failed to connect to AAD endpoint https://login.windows.net"
            $Global:ChecksFailure++
        }
        else
        {
        write-host -ForegroundColor green "["(date -format "HH:mm:ss")"]" " -- This machine has internet access (we tried to contact https://login.windows.net)."
        $Global:ChecksSuccess++
        }
    }
    catch {
        write-host -ForegroundColor white "["(date -format "HH:mm:ss")"]" $_.Exception.Message
        write-host -ForegroundColor red "["(date -format "HH:mm:ss")"]" " -- Failed to connect to AAD endpoint 'https://login.windows.net'."
        $Global:ChecksFailure++
    }
}

function CheckSystemDisk {
    write-host -ForegroundColor yellow "["(date -format "HH:mm:ss")"]" "Checking system disk capacity..."

    $systemDisk = Get-Disk | ? {$_.IsSystem -eq $true}
    If ($systemDisk.Size -lt 180 * 1024 * 1024 * 1024)
        {
            write-host -ForegroundColor red "["(date -format "HH:mm:ss")"]" " -- Check system disk failed - Size should be 180 GB minimum."
            $Global:ChecksFailure++
        }
        else
        {
            write-host -ForegroundColor green "["(date -format "HH:mm:ss")"]" " -- Check system disk passed successfully."
            $Global:ChecksSuccess++
        }
}

function CheckDisks {
    write-host -ForegroundColor yellow "["(date -format "HH:mm:ss")"]" "Checking physical disks..."

    write-host -ForegroundColor gray "["(date -format "HH:mm:ss")"]" " -- Listing of all physical disks on this server:"
    write-host -ForegroundColor gray (Get-PhysicalDisk | Format-Table -Property @("FriendlyName", "SerialNumber", "CanPool", "BusType", "OperationalStatus", "HealthStatus", "Usage", "Size") | Out-String)
    $physicalDisks = Get-PhysicalDisk | Where-Object { ($_.BusType -eq 'RAID' -or $_.BusType -eq 'SAS' -or $_.BusType -eq 'SATA') -and $_.Size -gt 135 * 1024 * 1024 * 1024 }
    $selectedDisks = $physicalDisks | Group-Object -Property BusType | Sort-Object -Property Count -Descending | Select-Object -First 1

    if ($selectedDisks.Count -ge 3) {
        write-host -ForegroundColor gray "["(date -format "HH:mm:ss")"]" " -- Listing of all physical disks meeting Azure Stack requirements:"
        write-host -ForegroundColor gray ($physicalDisks | Format-Table -Property @("FriendlyName", "SerialNumber", "BusType", "OperationalStatus", "HealthStatus", "Usage", "Size") | Out-String)
        write-host -ForegroundColor green "["(date -format "HH:mm:ss")"]" " -- Check physical disks passed successfully. Note that Azure Stack Technical Preview will now handle situations where there is a pre-existing storage pool, and will delete/recreate it."
        $Global:ChecksSuccess++
    }

    if ($selectedDisks.Count -lt 3) {
        write-host -ForegroundColor red "["(date -format "HH:mm:ss")"]" " -- Check physical disks failed - At least 4 disks or more of the same bus type (RAID/SAS/SATA), and of capacity 135 GB or higher are strongly recommended. 3-disk configurations may work but are not tested by Microsoft."
        $Global:ChecksFailure++
     }

}

function CheckFreeSpaceForExtraction {

    write-host -ForegroundColor gray "["(date -format "HH:mm:ss")"]" " Checking free space for extracting the Azure Stack files..."
    write-host -ForegroundColor gray "["(date -format "HH:mm:ss")"]" " -- Listing disks and their free space"
    write-host -ForegroundColor gray (Get-Disk | Get-Partition | Get-Volume | Sort-Object -Property SizeRemaining -Descending | Out-String)
    $volumes = (Get-disk | ? {$_.BusType -ne 'File Backed Virtual' -or $_.IsBoot} | Get-Partition | Get-Volume |`
         ? {-not [String]::IsNullOrEmpty($_.DriveLetter)} | sort -Property SizeRemaining -Descending)
    if (!$volumes -or ($volumes | Measure-Object).count -le 0) {
        Write-Host -ForegroundColor red "["(date -format "HH:mm:ss")"]" " -- Free space check failed. No volumes are available."
        $Global:ChecksFailure++
    }
    if ($volumes[0].SizeRemaining -lt 120 * 1024 * 1024 * 1024) {
        write-host -ForegroundColor red "["(date -format "HH:mm:ss")"]" " -- Free space check failed. Azure Stack requires 130 GB for the expansion of the Cloudbuilder.vhdx file. An additional 40 GB may be needed if you want to keep the ZIP and self extractor files."
        $Global:ChecksFailure++
    }
    else
    {
        write-host -ForegroundColor green "["(date -format "HH:mm:ss")"]" " -- Free space check passed successfully."
        $Global:ChecksSuccess++
    }
}

function CheckRam {
    write-host -ForegroundColor yellow "["(date -format "HH:mm:ss")"]" "Checking Memory..."

    $mem = Get-WmiObject -Class Win32_ComputerSystem
    $totalMemoryInGB = [Math]::Round($mem.TotalPhysicalMemory / (1024 * 1024 * 1024))
    write-host -ForegroundColor gray "["(date -format "HH:mm:ss")"]" " -- Memory on this server = $totalMemoryInGB"
    if ($totalMemoryInGB -lt 96) {
        write-host -ForegroundColor red "["(date -format "HH:mm:ss")"]" " -- Check system memory requirement failed. At least 96GB physical memory is required."
        $Global:ChecksFailure++
    }
    else
    {
        write-host -ForegroundColor green "["(date -format "HH:mm:ss")"]" " -- System memory check passed successfully. Azure Stack requires a minimum of 96 GB of RAM, with 128 GB recommended."
        $Global:ChecksSuccess++
    }
}

function CheckHyperVSupport {
    write-host -ForegroundColor yellow "["(date -format "HH:mm:ss")"]" "Checking Hyper-V support on the host..."

    $feature = Get-WindowsFeature -Name "Hyper-V"
    if ($feature.InstallState -ne "Installed") {
          $cpu = Get-WmiObject -Class WIN32_PROCESSOR
          $os = Get-WmiObject -Class Win32_OperatingSystem
          if (($cpu.VirtualizationFirmwareEnabled -contains $false) -or ($cpu.SecondLevelAddressTranslationExtensions -contains $false) -or ($cpu.VMMonitorModeExtensions -contains $false) -or ($os.DataExecutionPrevention_Available -eq $false)) {
            write-host -ForegroundColor red "["(date -format "HH:mm:ss")"]" " -- Hyper-V is not supported on this host. Hardware virtualization is required for Hyper-V."
            $Global:ChecksFailure++
         }
         else
         {
            write-host -ForegroundColor green "["(date -format "HH:mm:ss")"]" " -- This server supports the hardware virtualization required to enable Hyper-V."
            $Global:ChecksSuccess++
         }
    }
    else
    {
        write-host -ForegroundColor green "["(date -format "HH:mm:ss")"]" " -- Hyper-V is already installed. Note that the installer would enable it otherwise."
        $Global:ChecksSuccess++
    }
}

function CheckOSVersion {

    # Check Host OS version first, otherwist DISM will failed to get VHD OS version
    write-host -ForegroundColor yellow "["(date -format "HH:mm:ss")"]" "Checking Host OS version..."
    $hostOS = Get-WmiObject win32_operatingsystem
    write-host -ForegroundColor gray "["(date -format "HH:mm:ss")"]" (" -- Host OS version: {0}, SKU: {1}" -f $hostOS.Version, $hostOS.OperatingSystemSKU)
    $hostOSVersion = [Version]::Parse($hostOS.Version)

    $server2016OSVersionRequired = "10.0.14393"
    $server2016OSVersion = [Version]::Parse($server2016OSVersionRequired)
    $serverDataCenterSku = 8 # Server Datacenter
    $serverDataCenterEvalSku = 80 # Server Datacenter EVal

    if ($hostOSVersion -lt $server2016OSVersion -or ($hostOS.OperatingSystemSKU -ne $serverDataCenterSku -and $hostOS.OperatingSystemSKU -ne $serverDataCenterEvalSku)) {
        write-host -ForegroundColor red "["(date -format "HH:mm:ss")"]" " -- The host OS should be Windows Server 2016 Datacenter, version $server2016OSVersionRequired."
        $Global:ChecksFailure++
    }
    else
    {
        write-host -ForegroundColor green "["(date -format "HH:mm:ss")"]" " -- The host OS version matches the requirements for Azure Stack ($server2016OSVersionRequired)."
        $Global:ChecksSuccess++
    }
}

function CheckDomainJoinStatus {
    write-host -ForegroundColor yellow "["(date -format "HH:mm:ss")"]" "Checking domain join status..."

    $sysInfo = Get-WmiObject -Class Win32_ComputerSystem
    if ($sysInfo.PartOfDomain) {
        write-host -ForegroundColor red "["(date -format "HH:mm:ss")"]" " -- The host must not be domain joined. Please leave the domain and try again."
        $Global:ChecksFailure++
    }
    else
    {
        write-host -ForegroundColor green "["(date -format "HH:mm:ss")"]" " -- The host is not domain joined."
        $Global:ChecksSuccess++
    }

}

function CheckVMSwitch {

    write-host -ForegroundColor yellow "["(date -format "HH:mm:ss")"]" "Checking NIC status..."

    if (([array](Get-NetAdapter | ? {$_.Status -eq 'Up'})).Count -ne 1) {
        write-host -ForegroundColor red "["(date -format "HH:mm:ss")"]" " -- Multiple NICs, virtual switches or NIC teaming are not allowed. Please only keep one physical NIC enabled and remove virtual switches or NIC teaming."
        $Global:ChecksFailure++
    }
    else
    {
        write-host -ForegroundColor green "["(date -format "HH:mm:ss")"]" " -- NIC configuration passed successfully."
        $Global:ChecksSuccess++
    }
}

function CheckServerName {

    write-host -ForegroundColor yellow "["(date -format "HH:mm:ss")"]" "Checking server name..."

    write-host -ForegroundColor gray "["(date -format "HH:mm:ss")"]" " -- Server name is" $Env:COMPUTERNAME

  if ($Env:COMPUTERNAME -eq 'AzureStack') {
    write-host -ForegroundColor red "["(date -format "HH:mm:ss")"]" " -- Server name cannot be ""AzureStack"" since it conflicts with the domain name."
    $Global:ChecksFailure++
  }
  else
  {
    write-host -ForegroundColor green "["(date -format "HH:mm:ss")"]" " -- Server name does not conflict with future domain name AzureStack.local."
    $Global:ChecksSuccess++
  }
}


function CheckCPU {

    write-host -ForegroundColor yellow "["(date -format "HH:mm:ss")"]" "Checking processor information..."

    $CPUCount = (Get-WmiObject -class win32_processor –computername localhost).count
    $CoreCount =  ((Get-WmiObject -class win32_processor –computername localhost -Property "numberOfCores")[0].numberOfCores)*$CPUCount
    write-host -ForegroundColor gray "["(date -format "HH:mm:ss")"]" " -- Number of CPU sockets = $CPUCount"
    write-host -ForegroundColor gray "["(date -format "HH:mm:ss")"]" " -- Number of physical cores =  $CoreCount"

    If (($CPUCount -lt 2) -or ($CoreCount -lt 12)){
    write-host -ForegroundColor red "["(date -format "HH:mm:ss")"]" " -- CPU count must be 2 or higher, Core count must be 12 or higher (16 cores recommended)."
    $Global:ChecksFailure++
  }
  else
  {
    write-host -ForegroundColor green "["(date -format "HH:mm:ss")"]" " -- CPU socket count (2) and core count (12) meet the minimum requirements for Azure Stack."
    $Global:ChecksSuccess++
  }
}

$ErrorActionPreference = 'Stop'

write-host -ForegroundColor gray "["(date -format "HH:mm:ss")"]" "Starting Deployment Checker for Azure Stack Technical Preview..."
Write-Host -ForegroundColor gray "["(date -format "HH:mm:ss")"]" "There are several prerequisites checks to verify that your machine meets all the minimum requirements for deploying Microsoft Azure Stack Technical Preview."
write-host -ForegroundColor gray "["(date -format "HH:mm:ss")"]" "For more details, please refer to the online requirements : https://azure.microsoft.com/en-us/documentation/articles/azure-stack-deploy/"

write-host -ForegroundColor gray "["(date -format "HH:mm:ss")"]" "Checking for Administrator priviledge..."

if (-not ([Security.Principal.WindowsPrincipal] [Security.Principal.WindowsIdentity]::GetCurrent()).IsInRole(`
        [Security.Principal.WindowsBuiltInRole] "Administrator"))
    {
        write-host -ForegroundColor red "["(date -format "HH:mm:ss")"]" " -- You do not have Administrator rights to run this script!`nPlease re-run this script as an Administrator!"
        break
    }

$checksHW = {CheckNestedVirtualization}, `
            {CheckSystemDisk},
            {CheckDisks},
            {CheckRam}, `
            {CheckCPU},
            {CheckHyperVSupport}`

$CheckHWOnly = {CheckFreeSpaceForExtraction}

$checksSW = {CheckDomainJoinStatus}, `
            {CheckInternetAccess}, `
            {CheckOSVersion}, `
            {CheckVMSwitch}, `
            {CheckServerName}


$Global:ChecksSuccess = 0
$Global:ChecksFailure = 0

#Checking if Azure Stack Technical Preview is already installed

$POCInstalledOrFailedPreviousInstall = $false
If ((get-module -Name Hyper-V -ListAvailable).count -gt 0)
    {
    $VMList = @("MACS-ACS01","MAS-ADFS01","MAS-ASql01","MAS-BGPNAT01","MAS-CA01","MAS-Con01","MAS-DC01","MAS-Gwy01","MAS-NC01", "MAS-SLB01", "MAS-SUS01", "MAS-WAS01", "MAS-Xrp01")
    If ((Get-VM $VMList -ErrorAction SilentlyContinue).Count -gt 0)
        {$POCInstalledOrFailedPreviousInstall = $true}
    }
If ($POCInstalledOrFailedPreviousInstall)
    {
    write-host -ForegroundColor red "["(date -format "HH:mm:ss")"] This machine seems to host an existing successful or failed installation of Azure Stack Technical Preview. The prerequisite checker is meant to be run prior to installation, and will return errors post-install, as some of the configuration may already have been applied (joining the domain, setting up storage pools,...)"
    If ((Read-Host "Do you want to continue anyway (Y/N)?") -eq "N")
        {
        break
        }
    }


write-host -ForegroundColor white "["(date -format "HH:mm:ss")"] This script can be run on the host where you will be configuring boot from VHD, for example prior to downloading the Azure Stack Technical Preview files. Or it can be run after booting from the provided Cloudbuilder.vhdx file where the Azure Stack Technical Preview will be installed. In the first case, it will only check for hardware specifications like memory, cores, hard disk configuration, as well as free space for extracting the Azure Stack files. In the second case, it will run both hardware and software tests, and other items like domain membership, OS version, NIC configuration will be checked."
Switch (Read-Host "Are you running this script on the host before booting in the provider VHDX file [1] or after booting into it [2] (any other input will exit the script)?")
    {
    "1"
    {
    write-host -ForegroundColor gray "["(date -format "HH:mm:ss")"]" "User chose to run pre-boot from VHD checks (hardware checks only)"
    $checks = $checksHW + $CheckHWOnly
    }
    "2"
    {
    write-host -ForegroundColor gray "["(date -format "HH:mm:ss")"]" "User chose to run post-boot from VHD checks (all checks except free space)"
    $checks = $checksHW + $checksSW
    }
    Default
    {
    write-host -ForegroundColor red "["(date -format "HH:mm:ss")"]" "User did not pick one of the two options, exiting script..."
    exit
    }
    }

$PreCheckProgressMessage = "Running Prerequisites Check"

for($i=0; $i -lt $checks.Length; $i++)
{
     Write-Progress -Activity $PreCheckProgressMessage -PercentComplete ($i * 100 / $checks.Length)
     Invoke-Command -ScriptBlock $checks[$i] -NoNewScope
}

Write-Progress -Activity $PreCheckProgressMessage -Completed

If ($Global:ChecksSuccess -eq $Checks.Length)
    {
    Write-Host -ForegroundColor green "["(date -format "HH:mm:ss")"]" "SUCCESS : All of the prerequisite checks passed."
    }
    else
    {
    Write-Host -ForegroundColor red "["(date -format "HH:mm:ss")"]" "FAILURE:"$ChecksFailure "prerequisite check(s) failed out of" $Checks.Length ". Please review previous entries to understand where the requirements are not met."
    }


write-host -ForegroundColor gray "["(date -format "HH:mm:ss")"]" "Deployment Checker has finished checking Azure Stack requirements"
Run the script from PowerShell. Open Windows PowerShell run as administrator.

1. Rename the file become Invoke-AzureStackDeploymentPreCheck.PS1
2. Then SetExecution Policy : Set-ExecutionPolicy -Scope Process -ExecutionPolicy Unrestricted -Confirm -Force
3. Run again the script : .\Invoke-AzureStackDeploymentPreCheck.PS1
For best results, even if you want to use a disconnected Azure Stack environment, it is best to deploy while connected to the internet. That way, the Windows Server 2016 evaluation version can be activated at deployment time. If the Windows Server 2016 evaluation version is not activated within 10 days, it shuts down.
Download and extract Microsoft Azure Stack POC
Before you start the download, make sure that your computer meets the following prerequisites:
The computer must have at least 60 GB of free disk space.
In the Azure Stack POC Downloader window, follow steps 1 through 5. After you click Download, choose a folder to download the files.
After the download completes, click Run to launch the MicrosoftAzureStackPOC.exe.
Review the License Agreement screen and information of the Self-Extractor Wizard and then click Next.
Review the Privacy Statement screen and information of the Self-Extractor Wizard and then click Next.
Select the Destination for the files to be extracted, click Next.
The default is: :\Microsoft Azure Stack POC
Review the Destination location screen and information of the Self-Extractor Wizard, and then click Extract to extract the CloudBuilder.vhdx (~35 GB) and ThirdPartyLicenses.rtf files.
Note
After you extract the files, you can delete the exe and bin files to recover space on the machine. Or, you can move these files to another location so that if you need to redeploy you don’t need to download the files again.
Prepare the deployment machine
Make sure that you can physically connect to the deployment machine, or have physical console access (such as KVM). You will need such access after you reboot the deployment machine in step 9 below.
Log in as the Local Administrator to your POC machine.
Copy the CloudBuilder.vhdx file to the root of the C:\ drive (C:\CloudBuilder.vhdx).
Note
If you choose not to use the recommended script to prepare your POC host computer (steps 5 – step 7), do not enter any license key at the activation page. A trial version of Windows Server 2016 image is included, and entering a license key causes expiration warning messages.
On the POC machine, run the following PowerShell script to download the Azure Stack support files:
This script downloads the Azure Stack support files to the folder specified by the $LocalPath parameter.
Open an elevated PowerShell console and change the directory to where you copied the support files.
Run the PrepareBootFromVHD.ps1 script. This script and the unattend files are available with the other support scripts provided along with this build. There are five parameters for this PowerShell script:
Parameter
Required/Optional
Description
CloudBuilderDiskPath
Required
The path to the CloudBuilder.vhdx on the HOST.
DriverPath
Optional
Lets you add additional drivers for the host in the VHD.
ApplyUnattend
Optional
Specify this switch parameter to automate the configuration of the operating system. If specified, the user must provide the AdminPassword to configure the OS at boot (requires provided accompanying file unattend_NoKVM.xml). If you do not use this parameter, the generic unattend.xml file is used without further customization. You'll need KVM access to complete customization after it reboots.
AdminPassword
Optional
Only used when the ApplyUnattend parameter is set, requires a minimum of six characters.
VHDLanguage
Optional
Specifies the VHD language, defaulted to “en-US.”
The script is documented and contains example usage, though the most common usage is:
If you run this exact command, you must enter the AdminPassword at the prompt.
When the script is complete, you must confirm the reboot. If there are other users logged in, this command will fail. If the command fails, run the following command: Restart-Computer -force
The HOST reboots into the OS of the CloudBuilder.vhdx, where the deployment continues.
Run the PowerShell deployment script
Log in as the Local Administrator to your POC machine. Use the credentials specified in the previous steps.
Important
Azure Stack requires access to the Internet, either directly or through a transparent proxy. The POC deployment supports exactly one NIC for networking. If you have multiple NICs, make sure that only one is enabled (and all others are disabled) before running the deployment script in the next section.
Open an elevated PowerShell console.
In PowerShell, run this command: cd C:\CloudDeployment\Setup. If you don't supply any parameters (see InstallAzureStackPOC.ps1 optional parameters below), you'll be prompted for the required parameters.
You can deploy Azure Stack with Azure Active Directory or Active Directory Federation Services. Azure Stack, resource providers, and other applications work the same way with both. To learn more about what is supported with AD FS in Azure Stack, see the Key features and conceptsarticle.
To deploy Azure Stack with Azure Active Directory, run the deploy command:
Copy
PowerShell
cd C:\CloudDeployment\Setup
$adminpass = ConvertTo-SecureString"〈LOCAL_ADMIN_PASSWORD〉" -AsPlainText -Force
.\InstallAzureStackPOC.ps1 -AdminPassword $adminpass
To deploy the Azure Stack POC with Active Directory Federation Services instead, run the following script (you just need to add the -UseADFS parameter):
In this AD FS deployment, the default stamp Directory Service is used as the identity provider, the default account to sign in with is azurestackadmin@azurestack.local, and the password to use is the one you provided as part of the setup.
If you used the AAD option, enter the credentials for your Azure Active Directory account. This user must be the Global Admin in the directory tenant.
The deployment process can take a few hours, during which the system automatically reboots once.
Important
If you want to monitor the deployment progress, sign in as azurestack\AzureStackAdmin. If you sign in as a local admin after the machine is joined to the domain, you won't see the deployment progress. Do not rerun deployment, instead sign in as azurestack\AzureStackAdmin to validate that it's running.
When the deployment succeeds, the PowerShell console displays: COMPLETE: Action ‘Deployment’.
If the deployment fails, you can try run the script again using the -rerun parameter. Or, you can redeploy it from scratch.
AAD deployment script examples
You can script the entire AAD deployment. Here are some examples.
If your AAD Identity is only associated with ONE AAD Directory:
If your environment DOESN'T have DHCP enabled, you must include the following ADDITIONAL parameters to one of the options above (example usage provided):
Sets the Azure Active Directory user name and password. These Azure credentials must be an Org ID.
InfraAzureDirectoryTenantName
Required
Sets the tenant directory. Use this parameter to specify a specific directory where the AAD account has permissions to manage multiple directories. Full Name of an AAD Directory Tenant in the format of .onmicrosoft.com.
AdminPassword
Required
Sets the local administrator account and all other user accounts on all the virtual machines created as part of POC deployment. This password must match the current local administrator password on the host.
AzureEnvironment
Optional
Select the Azure Environment with which you want to register this Azure Stack deployment. Options include Public Azure, Azure - China, Azure - US Government.
EnvironmentDNS
Optional
A DNS server is created as part of the Azure Stack deployment. To allow computers inside the solution to resolve names outside of the stamp, provide your existing infrastructure DNS server. The in-stamp DNS server forwards unknown name resolution requests to this server.
NatIPv4Address
Required for DHCP NAT support
Sets a static IP address for MAS-BGPNAT01. Only use this parameter if the DHCP can’t assign a valid IP address to access the Internet.
NatIPv4DefaultGateway
Required for DHCP NAT support
Sets the default gateway used with the static IP address for MAS-BGPNAT01. Only use this parameter if the DHCP can’t assign a valid IP address to access the Internet.
NatIPv4Subnet
Required for DHCP NAT support
IP Subnet prefix used for DHCP over NAT support. Only use this parameter if the DHCP can’t assign a valid IP address to access the Internet.
PublicVLan
Optional
Sets the VLAN ID. Only use this parameter if the host and MAS-BGPNAT01 must configure VLAN ID to access the physical network (and Internet). For example, .\InstallAzureStackPOC.ps1 –Verbose –PublicVLan 305
Rerun
Optional
Use this flag to rerun deployment. All previous input is used. Re-entering data previously provided is not supported because several unique values are generated and used for deployment.
TimeServer
Optional
Use this parameter if you need to specify a specific time server.
Reset the password expiration to 180 days
To make sure that the password for the Azure Stack POC machine doesn't expire too soon, follow these steps after you deploy:
Log in to the Azure Stack POC physical machine as azurestack\azurestackadmin.
Run the following command to display the current MaxPasswordAge of 42 days: Get-ADDefaultDomainPasswordPolicy
Run the following command to update the MaxPasswordAge to 180 days:
Run the following command again to confirm the password age change: Get-ADDefaultDomainPasswordPolicy.
Connect to Azure Stack
To manage resources, you must connect to the Azure Stack POC computer. You can use either of the following connection options:
Remote Desktop: lets a single concurrent user quickly connect from the POC computer.
Virtual Private Network (VPN): lets multiple concurrent users connect from clients outside of the Azure Stack infrastructure (requires configuration).
Connect with Remote Desktop
With a Remote Desktop connection, a single concurrent user can work with the portal to manage resources. You can also use tools on the MAS-CON01 virtual machine.
Log in to the Azure Stack POC physical machine.
Open a Remote Desktop Connection and connect to MAS-CON01. Enter AzureStack\AzureStackAdmin as the username, and the administrative password you provided during Azure Stack setup.
On the MAS-CON01 desktop, open Server Manager, click Local Server, turn off Internet Explorer Enhanced Security, and then close Server Manager.
In an Azure Stack Proof of Concept (POC) environment, you can use a Virtual Private Network (VPN) to connect your local Windows-based computer to Azure Stack.VPN connectivity is supported for Azure Stack instances deployed through Azure Active Directory(AAD) or Active Directory Federation Services(AD FS) . VPN connections enable multiple clients to connect to Azure Stack at the same time.
Through the VPN connection, you can access the administrator portal, user portal, and locally installed tools such as Visual Studio and PowerShell to manage Azure Stack resources.
Note
This VPN connection does not provide connectivity to Azure Stack infrastructure VMs.
The following sections describe the steps that are required to establish VPN connectivity to Azure Stack.
After you download the tools, navigate to the downloaded folder and import the Connect PowerShell module by using the following command:
Copy
PowerShell
Import-Module .\Connect\AzureStack.Connect.psm1
When you import the module, if you receive an error that says “AzureStack.Connect.psm1 is not digitally signed. The script will not execute on the system”. To resolve this issue, run the following command in an elevated PowerShell session:
Copy
PowerShell
Set-ExecutionPolicy Unrestricted
Configure VPN to Azure Stack PoC computer
To create a VPN connection to the Azure Stack PoC computer, use the following steps:
Add the Azure Stack PoC computer’s host IP address & certificate authority(CA) to the list of trusted hosts on your client computer by running the following commands in an elevated PowerShell session:
Assign the Azure Stack host IP address and administrator password to the $hostIP and $Password variables by running the following PowerShell commands and make sure that you populate the administrator password and fields:
Copy
PowerShell
#Change the IP address in the following command to match your Azure Stack host IP address$hostIP = ""# Change the password in the following command to administrator password that is provided when deploying Azure Stack. $Password = ConvertTo-SecureString"" -AsPlainText -Force
Get the Azure Stack host computer’s NAT IP address. If you do not remember the NAT IP address of the Azure Stack PoC instance you are trying to connect to, you can get it by using the Get-AzureStackNatServerAddress command:
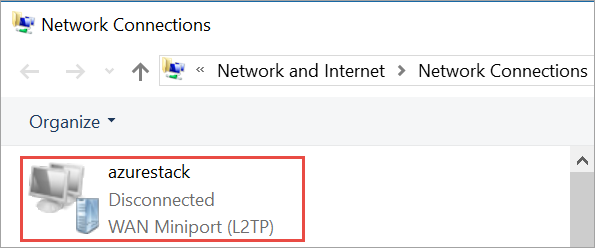
If the connection succeeds, you should see azurestack in your list of VPN connections.
Connect to the Azure Stack instance by using either of the following methods:
a. Connect-AzureStackVpn command:
Copy
PowerShell
Connect-AzureStackVpn -Password $Password
When prompted, trust the Azure Stack host and install the certificate from AzureStackCertificateAuthority into your local computer’s certificate store. (the prompt might appear behind the PowerShell session window).
b. Open your local computer’s Network Settings > VPN >click azurestack > connect
At the sign in prompt, enter the username (AzureStack\AzureStackAdmin) and the password. If the connection succeeds, the azurestack VPN should be in a connected state.